
 |
| Burda style shot of 2012-116 |
(This pattern was released a short time ago. I've hurried to put a post up to be helpful to others who are thinking about sewing the shirt. If you have had better luck than me, please post a link or comment to this post. )
After spending an hour trying to figure out what pieces to add a seam allowance to, spending three hours stitching the pattern as directed, and after that, spending another hour or two making all the alterations I could imagine, I still hate the Burda blouse pattern 116 published on the website July 2012.
Following the sizing chart for Burda patterns, I selected a size 38 based on my bust measurement. I was in between sizes and decided that it was best to size up. A size 38 is approximately a 6 US. A 6 seemed a bit small since I normally wear an 8 in ready to wear, but I went with it. This is where the story turns to disappointment. I neglected to measure the pattern pieces prior to sewing to check ease. If I would have known that a size 38 was WAY too big, I could have saved SO much time and cut the correct size, which I am guessing is a size 34. Note, 34 is the smallest size printed. I did complete the project using the original size 38 and made adjustments only after nearly completing the shirt.
The most noticeable different I made to the design was my choice of fabric. I had a colorful fabric on hand which I pretty much love...still. I wish I would have saved it for a different project. It is a sheer rayon mix, so I thought it would be a good translation of the advertised blouse. The pattern calls for a double layer, but I did not want the messiness of seeing stripes on-top of stripes so a single front and back was cut.
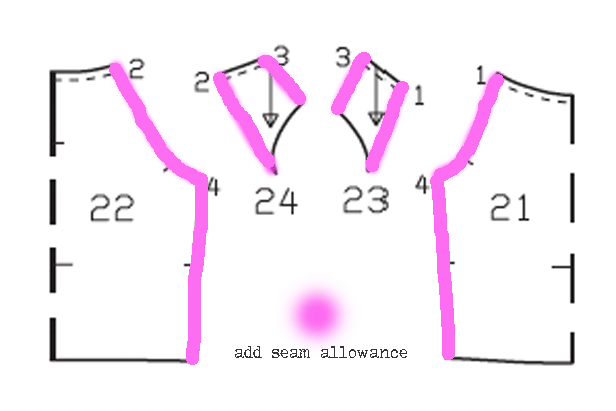 |
| add seam allowance as indicated by pink line |
Surprisingly, the directions are easy to understand. As warned by other seasoned seamstresses, not all seams need an additional allowance in Burda patterns. Since edges are finished with binding, there are only a couple of sections that need it with this piece; the seams that connect the shoulders, the sleeves to the body of the blouse, plus the sides. Read the directions before tracing your pattern, this will help (maybe).
 |
| the "original" without tailored side seams |
The shirt did end up looking like the Burda picture, but only in an obscure way. I am positive that there was an enormous effort from the stylist to make the shirt as attractive as it appears. The picture looks as if you are creating a breezy comfortable shirt that is slightly fitted. What I created was a breezy oversized box that was very unflattering. The armholes were too big, the neck is a little too high, and I would look better wearing a pillowcase with holes cut for my appendages. To that end, I vow I will not sew this pattern again and I would not recommend it used by others. I really wish I had something nicer to say about the pattern.
 |
| finished front |
Like I mentioned, I first made the blouse following the pattern and directions from Burda. In an effort to finish the inside of the shirt, I installed french seems on all exposed raw edges; this is where a majority of the time was consumed. When the finished results of the original version turned out to be hideous (in my opinion), I torn the side seams out. Deciding that a curved seam would greatly improve things, I followed the lines of the Sorbetto tank in a size 10, leaving the neckline as originally drafted and redoing the french seams.
 |
| finished back |
The side alteration meant an adjustment of approximately 3 inches on each side. Eliminating the extra bulk made an enormous difference to the overall look, but more importantly to the feel and style. The original shirt felt as if it was wearing me. The new version is definitely more tailored. I did have to make adjustments to the sleeves, binding the armhole entirely was the most kind option. This was done by loping off the corner of one piece and using that as a template for the other three. I also shorten the blouse by roughly 2 inches and finished the hem with binding.
 |
| modified front |
The binding was completed by sewing the outside facing side with a sewing machine and then hand sewing the inside. The binding is wider than directed, solely because the fabric was a bit slippery to handle. The bias measured 1.5 inches cut on the diagonal.
 |
| Modified back |
I am not sure if I like this pattern at all; I mean, I do not like this pattern at all. It was a huge disappointment when I finished the project, even after my alterations. I certainly would not use this pattern exactly as printed again. In addition to the alterations I made to the original shirt, I would consider lowering the neck, increasing the necks circumference, and adding a bust dart.
 |
| ideal new shape |
This simple Burda blouse is the first pattern I have ever made from this company. I decided to start with something that would be easy just to see how the directions and pattern work together, learn the intricacies, or at least some, of the pattern company. A simple shirt with four pieces, no interfacings, no buttonholes, no darts…“sure”, I thought, “it would be quick and easy.” After I was finished, I could move on to the jacket that I really want to make by the same company. If only thoughts were always true. The $5.40 I spent for this pattern was a waste, along with my countless hours that it took to finish a shirt I will more than likely never wear. Do I dare start the jacket? I really want the coat. So maybe time will heal my ego/nerves.
You did a great job improving that garment. You added smartness where there was none.
ReplyDeleteI have been sewing Burda patterns for a long time and since BurdaStyle came into being, after I believe Aenna Burda passed on, the patterns have been mediocre and not nearly as well designed/cut. The old Burda Fashion magazines headed by Aenna Burda had marvellous detail and were very well drafted. In my view the name Burda is no longer synonymous with the style and fit it used to offer. Having said all that, the latest two issues do look like they've improved their game.
Maybe the next pattern will be a happier result for you.
I have hope that the next pattern will workout better. But just in case it stinks, I think I will try one of the Friday Freebies---that way I won't be so upset.
DeleteIf you don't know already, BurdaStyle posts free downloads on fridays. :-)